
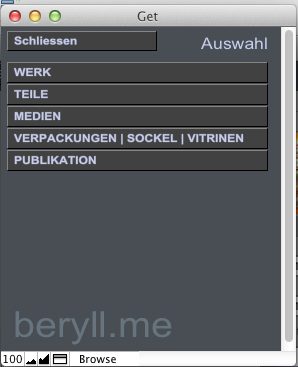
Searching the beryll manual
For quick and conclusive search results please download the beryll manual as a PDF. Save it to your computer and open it with a separate program such as Preview, PDF-Viewer etc.
PDF “beryll manual”
All keys, buttons, and other ways to work with functions are displayed and explained together with the matching image. This makes finding your way around the beryll.2.5 database very visual and easy to learn.
This page explains all the fields in the Collection layout in order of appearance, with content-related examples.
This page explains all the fields in the Exhibition layout in order of appearance, with content-related examples.
This page explains all the fields in the Publication layout in order of appearance, with content-related examples.
This page explains all the fields in the Contacts layout in order of appearance, with content-related examples.
The modules and functions provided in the Specials section are listed and explained.
This page describes the various possibilities in the Office module.
The Layout page describes the different viewing options and dataset layouts.
A step-by-step guide to your printout.

beryll.me
This button activates a pop-up window with news from the beryll website. From this pop-up you can go on to the manual.
Quick tip
If you hover over a button with the cursor a little note will appear to explain its function.

Languages
beryll has the ability to switch between german, english and french as you go. This changes the field titles, but not the field content. There are however some fields where you can make entries in all three languages, namely title, category, subcategory, material and technique. Thus the content will adapt when you switch from one language to another.

New
Create a new empty dataset.

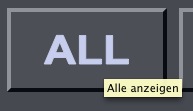
ALL
Show all datasets.

Exclude
Exclude or hide dataset (no longer displays this dataset in the current selection). Used, for instance, in combining datasets for a print command.

Delete
Delete this dataset.

Duplicate
Use this button to duplicate a dataset. This is helpful when you are recording editions or multi-part works so you do not have to type in the same information again and again.
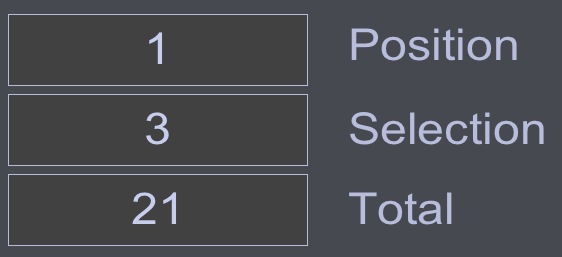
Position / Selection / Total
Position = Which dataset am I in?
Selection = How many datasets are in my current selection? (If the Selection should happen to not be correct, click the ALL button to refresh the display.)
Total = How many datasets does this module contain?

Go to dataset number
Clicking the questionmark opens a little window where you can enter a dataset number (ID). This lets you jump directly to the desired dataset.

Navigation
Navigation button: move between datasets.
<< to the first dataset
< to the previous dataset > to the next dataset
>> to the last dataset
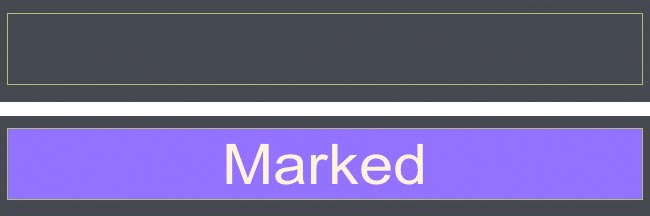
Marked
Add the marker by clicking on the Marking field: an M or the word Marked will appear. Click this field again to remove the marker.
The PICTURES module offers two different markers, which means you can work with two groups at the same time.

Mark
Datasets may be marked, allowing you to easily group them for editing later on. Pressing the Mark button opens a pop-up window with various options, e.g. display all marked datasets, remove all markers, assign markers to all selected datasets.

Selection
Group datasets together according to various criteria. Pressing the Selection button opens a pop-up window with various options, e.g. show records with Parts / Editions, show records from this Author, with pictures.

Sorting
Pressing the Selection button opens a pop-up window where you can choose which criteria to sort by (e.g year created) in ascending or descending order.
This only affects the records in your current selection. If you want to sort all records, press the ALL button first.
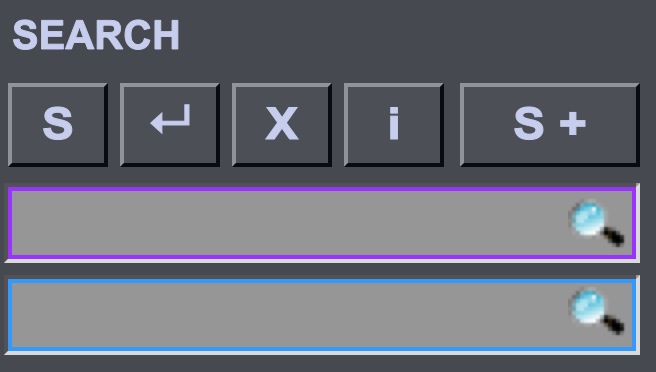
Search
S = Free search
This button shifts all fields of the input mask into search mode. Search keywords may be entered directly in the fields.
Start the search by clicking the Enter button. You may also press the Enter key on your keyboard.
X = Abort. If you would like to discontinue the search, click on Abort.

Info window
Upon mouse-over a brief information with the most important search operators appears. Pressing the Info key opens a pop-up window in which all the search operators are described in detail.

Search +
Search + allows you to search and group datasets according to several criteria at once and to group them in various selections. Enter the search terms and, if necessary, FIND MORE and confirm the search by pressing the Enter key on your keyboard or by clicking on the Enter button in the input mask.
IMPORTANT: Search terms within the same search line are linked with the connector AND, so the result will include all search terms which were entered in the available search fields. Mutliple search lines are linked with the connector OR, so the result includes the search term/terms in one line or in the other.
Example 1: In the first line, enter “2007” under Year created and “painting” (but without the quotation marks) under Subcategory: The search result will include all datasets with 2007 as Year created AND painting as Subcategory.
Example 2: In the first line, enter “2007” under Year created and click on FIND MORE. In the second line, enter “painting” under Subcategory: the search result will include all datasets that have 2007 as Year created OR painting as Subcategory.
In the same manner you may click on FIND MORE to add more search lines with one or several search terms. By clicking on the COLLECTION button in the main menu bar the search result may then be transferred (in the case of this example) to the WORK Info page, where the selection may be edited until a new search is initiated or the selection is cancelled.

Total search / Quick search
Total search: the simplest search option in each module is to enter the search keyword in this field and confirm the search with the Enter key on your keyboard or by moving outside of the field. The search covers all fields in the main table including links, not however the fields in the portals. This option may take some time since all fields are being scanned. The Total search entry field has a purple frame.
Quick search: the Quick search scans the key fields in the main table. In the EXHIBITION module this would be Title, Type, Status, City / Town, Exhibition venue, Curator etc. The Quick search entry field has a blue frame.
Price – Hide
Hides the prices in all records of the current module. A second click displays the prices again. If access to price information is not intended for all users you can create a password in the SPECIALS – Settings module.
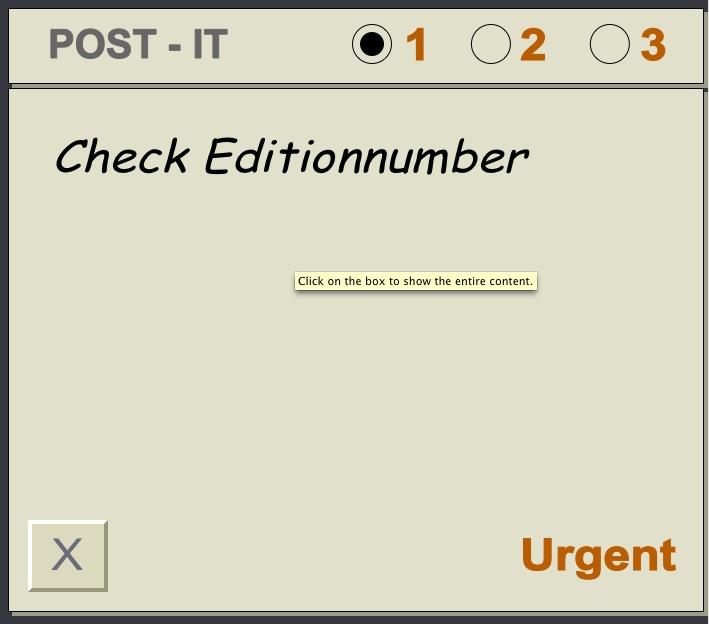
Post-it
Post-it allows you to post notes to yourself and label these with priority 1, 2 or 3. If marked 1 (urgent), the note will appear in the TO-DO module every day until taken care of or no longer assigned first priority. The X button deletes the entry and marker.
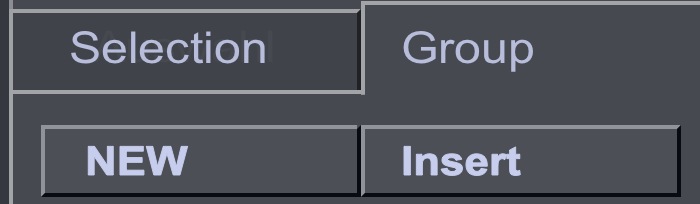
Group
After clicking on Group you can choose Insert in order to add the current record or current selection of records to a group from the drop-down menu.
The NEW button creates a new group in the current record, which you can label as you like. This new group is then automatically added to the list of existing groups.
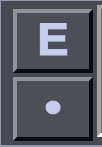
Group / Edit or Delete
Press the E button to edit, i.e. rename the group.
The dot button removes the group from the current record.
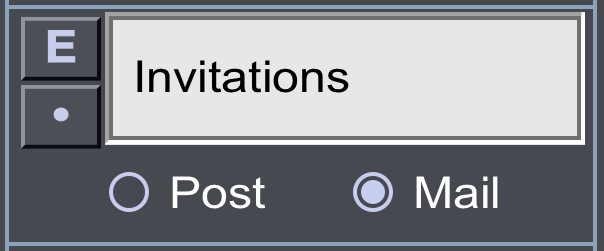
Group / Edit or Delete in Contacts
Press the E button to edit, i.e. rename the group.
The dot button removes the group from the current record.
Choose either Post or Mail. These groups are used to send email newsletters or circulars.
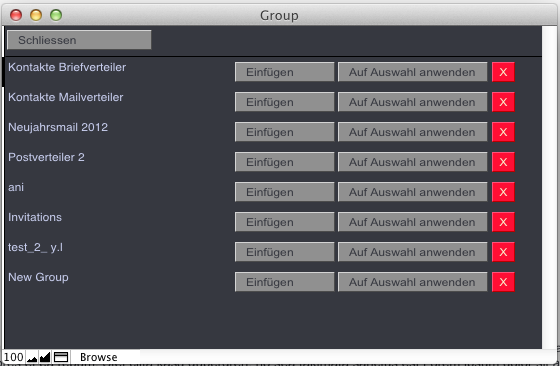
Group / Insert
After clicking on Group you can choose Insert in order to add the current record or current selection of records to a group from the drop-down menu. Choose the group by scrolling or search for a particular word.
Paste = Adds the current record to the group.
Apply to selection = Adds all records in your selection to the group. (The current selection is displayed in the navigation bar to the right.)

Purchase / Activate
If you press Purchase or Activate a pop-up window will open where you can request and enter the applicable code.
Within a few minutes you will receive an email with your activation code.
With this code you can try your beryll product and create up to 50 data sets in each module.
In case of a purchase your version will be unlocked for unlimited use and you can continue your work.

plus / minus
Plus adjusts the programme window to full-screen display, minus switches to the smallest possible size.
Adjust Info Formula
Hides or displays the field titles in the Info-layout and in Print-layouts.
Example:
Year created: 1968
Inventory number: INST__000046
Edition: unique
Subcategory: Installation
With hidden field title display:
1968
INST__000046
unique
Installation

Import
The Import button lets you import individual pictures or entire folders. These will be allocated to the record from which you perform the import. The number to the right shows how many pictures already are allocated.

Insert
Press Insert to allocate already imported pictures to a record. In the pop-up window you can sort the pictures by used / unused or search for a particular term.

Show all pictures
This button connects to the Pictures module where you see all pictures that are allocated to the record in question. The Pictures module also contains further information regarding the image and shows links to the other modules.

Delete image
This button is found next to images. Clicking it irrevocably deletes the image in question.

Remove
This button removes connections, but does not delete not the allocated dataset.

Reference image
In the modules COLLECTION, EXHIBITION, PUBLICATION and CONTACT you can import or allocate images. One image can be marked as a reference image to be used for layouts.

Google
Opens a browser window and displays the results of a Google search on the name of the author, contact, company etc. The web search function is also available by clicking on the underlined active fields titles in all modules.

Allocate
Allows you to search for contacts or allocate works, exhibitions or publications.

Confirm allocation
Confirm allocation and return to original dataset.
If you have started the allocation process beryll will go to the module in which you can find the desired entry.
An example: In the COLLECTION module you pressed “Z” as in Allocate to find the author of a work. This takes you to the CONTACT module. Here you can navigate or search for the right contact. If you cannot find them, use the “NEW” button to create a new record. As soon as you have got the correct entry that you wish to allocate as the author, press the red “Confirm allocation” button in the navigation bar.

I
The I button uploads the information related to the person defined as I in Contacts.

Up / Down
Scrolls up or down in sets of data entries.
New portal entry
Data that are organized in a particular table (module) may be supplemented with additional information (data) through a subtable. Such “windows to other datasets” are referred to as portals.
A portal can hold multiple entries for the same dataset, for example several measurements or several appraised values. The vertical NEW button appears in portals and creates a new entry within a portal.

Historicize
The Historicize function allows you to record changes in the COLLECTION module whenever there is a change in the condition of a work. By clicking on “Historicize” you may save the data previously recorded as “historical” and then enter the updated information as “current.” The HISTORY table allows you to keep track of changes in the condition of a work.

Go to
Takes you to the corresponding dataset.

Active Field titles
If a field title is underlined you can click on it. In the COLLECTION, EXHIBITION, and PUBLICATION modules you can click on Title which will trigger a Google search for the entry in this field.
In other cases the underlined field title works like a “Go to” button that takes you to the corresponding dataset. This is mostly the case in fields with contact entries.
Drop-down menus
The drop-down menus are an easy way to fill out entry fields. Anything that has been typed into a particular field will be stored in the list for future use.
If you happen to find a spelling error in a drop-down list, use the “S” button to switch into search mode, enter the typo in the applicable field and execute the search. Now correct the spelling error. Once you have corrected all the records with the typo it will also be gone from the list.
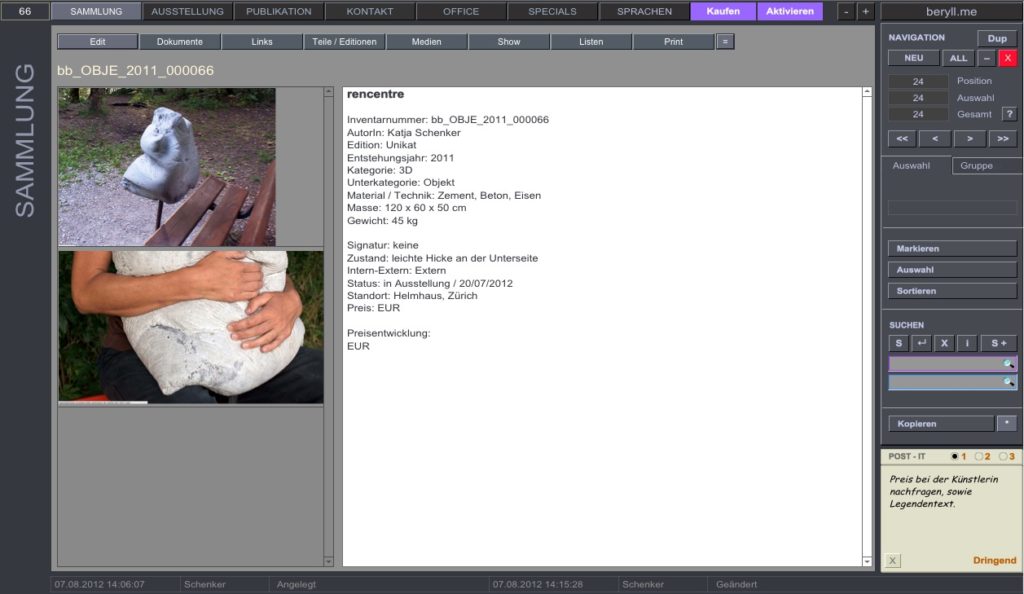
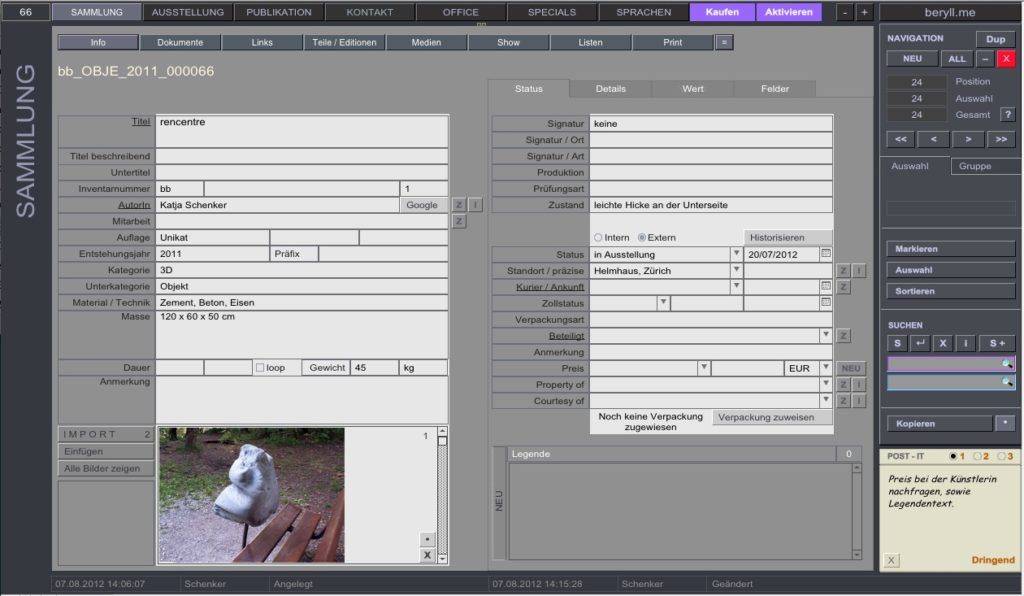
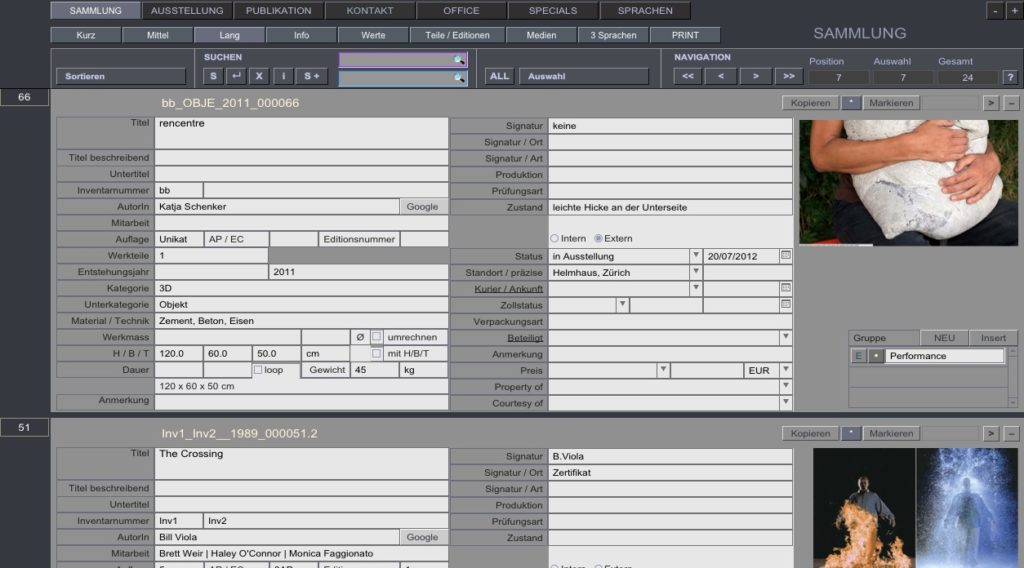
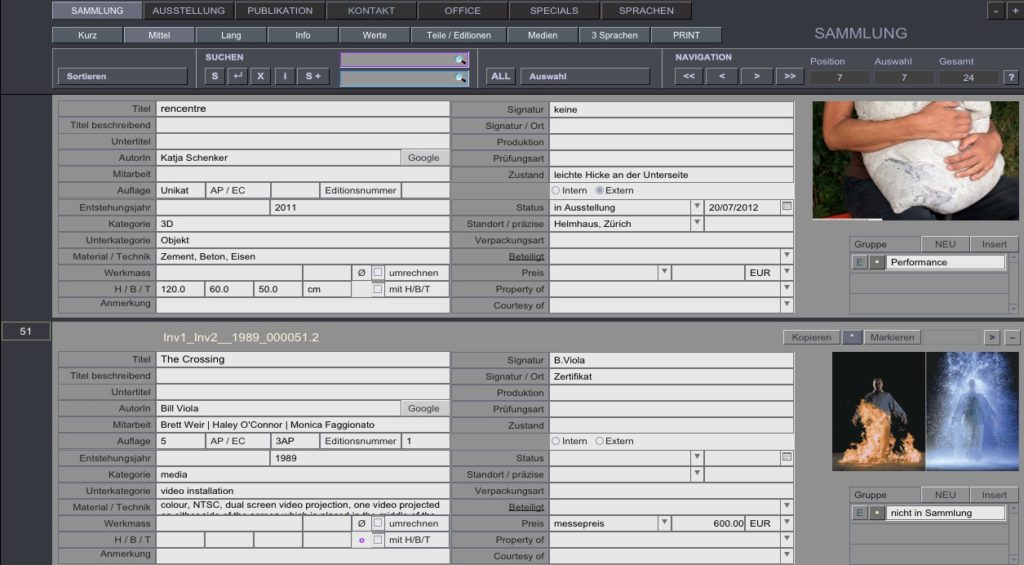
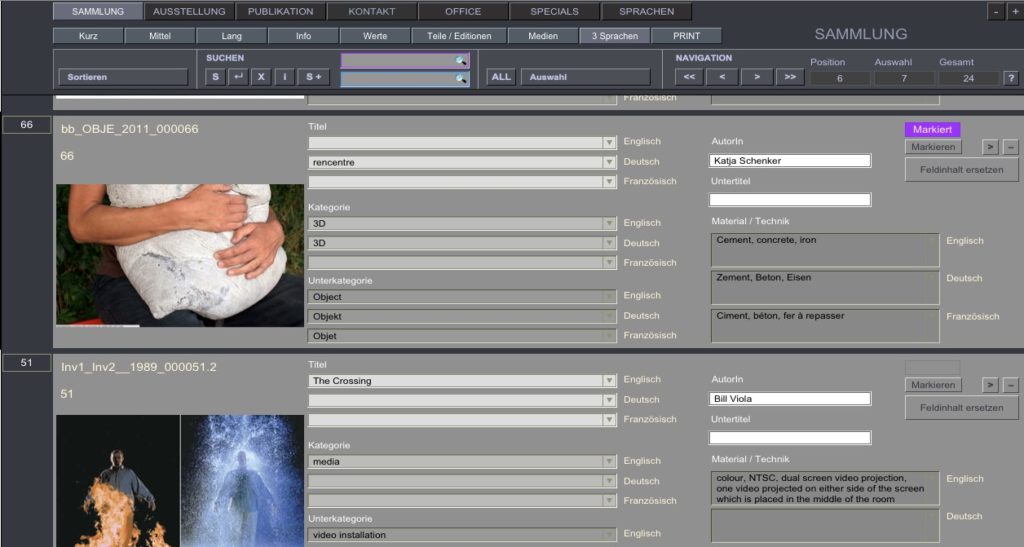
COLLECTION Info / Edit
COLLECTION Info / Edit comprises the basic data of an artwork.
Inventory number
The inventory number is an ID of sorts for each individual work. The inventory number composition can be defined under SETTINGS. Pressing the inventory numbers will copy it to the clipboard so that you can paste it in to any document using command V (Mac) or Ctrl V (Win).
Title
Title of object / work (only if the details are known, otherwise leave this field empty and use the field “Title descriptive”.)
Title descriptive
If the object / work has no title, you may use this field to describe it.
Subtitle
Subtitle of the object / work
Inventory number
Entries in this field appear as the first part of the inventory number.
Inventory number 2
Entries in this field appear as the second part of the inventory number.
Number of parts
Does the object or work consist of several parts? Numbers higher than 1 are reflected in the inventory number to show that this is a multi-part work.
Author
Who created the work?
Collaboration
List people or companies involved in creating the work.
Edition
Total number of copies
Editionnumber
Designates the individual copy within an edition, e.g. 4.
AP / EC
Number of Artist’s Proofs or Exhibition Copies (e.g. 2AP, 1EC).
Year created
When was the work created?
Year created prefix
Here you can enter comments such as “approximately” or “assumed” in case the year of creation is uncertain. Keeping the Year created-entry field just for numbers will ensure that the work shows up in search results for the year in question.
Category
A basic description of the art form (e.g. 2D, 3D, Media or Live Art).
Subcategory
Describe the type of work here (e.g. single-channel video, sculpture, photograph, performance, painting or installation). This entry may be included in the inventory number as a whole or in abbreviated form.
Material / Technique
Describe the technique and media / materials used (e.g. acrylic on fabric, pencil on paper, colorproof on aluminum, various materials, mixed media, oil on canvas, video color/sound/stereo, etc.)
Dimensions
You may list the dimensions of the work in inches or centimeters. Select the unit of measurement in the light blue field. beryll automatically converts dimensions and displays them. This entry can also hold comments relating to the listed dimensions (eg. framed, unframed, etc).
Duration / loop
You can list the duration for video or audio works and indicate whether it is looped or not.
Weight
The weight is important for the delivery note and may be entered in kg or lb. beryll automatically converts your entry to the other unit of measurement and displays the result.
Note
Enter further notes regarding the work here. They will be included wherever the basic information of the work is displayed within the COLLECTION module, but not in printed matter.
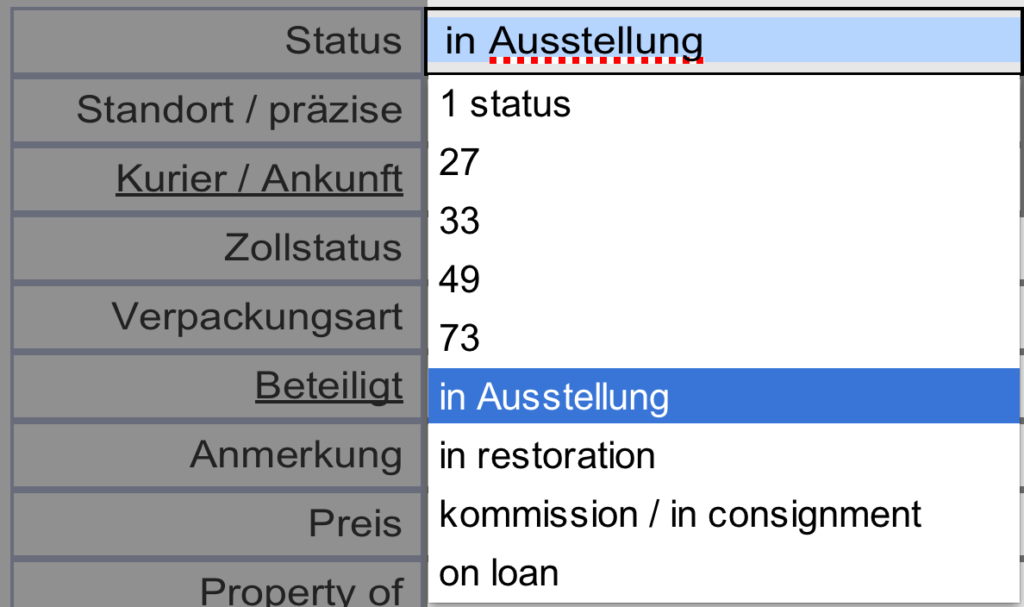
Status
Signature
List the exact wording of any signature, e.g. Eva Hesse, New York 1969.
Signature / place
Where is the signature placed? e.g. recto, bottom left etc.
Signature / type
What kind of signature is it? e.g. handwritten
Production
By whom and when was the object / work produced?
Examination type
Where does the condition information come from? e.g. visual inspection, condition report, personal assessment, tentative or assumed, etc. (This can also give a clue as to how reliable or precise the condition information should be rated.)
Condition
What is the condition of the work? e.g. excellent, slightly damaged etc.
Status
e.g. stored, installed, sold, destroyed, not for sale etc.
Intern / Extern
Intern / Extern indicates whether a work is located within any of your premises.
Location / exact
List and specify the location, e.g. storage, studio / shelf no. 3 drawer F
Courier / Arrival
List the shipping company / courier and delivery date.
Customs status / No.
How was a work imported? For example permanently, temporarily, or art import, etc. List the customs reference number in the second field.
Type of packaging
e.g. bubble wrap and cardboard packaging
Involved
List other persons / companies involved.
Note
Enter further notes here.
Price
In the first field you can enter a comment or label for the price, in the second field you list the price, and in the third you can either choose the currency from the drop-down menu or type straight into the field.
Property of
Enter the name(s) of the work’s owner(s) here.
Courtesy of
Enter the name of, for example, the artist, the collection or gallery which has made the work available here.
Historicize
The Historicize button transfers all condition-related information to the Status-History table (under Detail), allowing the dataset to be overwritten while the historicized data may still be viewed at any time.
Caption
Caption holds descriptions of the work in various languages, which you may use in documentations or catalogues.
Main entry
The checked entry is displayed at the top and is used in print layouts, allowing you to select the proper caption and desired language for each print-out.
Type
e.g. catalogue text, text for DVD cover
Language
Specify what language the entry is written in.
Detail
Inspect work
List what needs to be inspected and set a date. This information is automatically carried over into the TO-DO module and you will be reminded of the task. The prompt disappears once a new date has been set or the date is deleted.
Style
Allows you to enter information on the style, period or basic theme of the work.
Mounting
How should the work be mounted? (e.g. at eye-level, according to installation sketch, projection on wall-mounted screen, show ONLY on monitor, etc.)
Additional materials needed
Anything else that needs to be provided by the exhibiting organisation?
Loan conditions
e.g. The work must be fenced off, requires a guard, set-up only by the artist in person etc.
Note
Enter further notes here.
Loan fees
What fees do you wish to transfer to the borrower? (e.g. admin charges, wear and tear costs, packaging costs etc.) These fees can be imported from the loan invoice in the office module.
Status History
The Staus-History table allows you to keep track of changes in the condition of a work. You can view, delete or print out historicized datasets.
Price
Prices and price development
This entry automatically displays the price listed in the Status table. If it changes or you would like to record the price in a different currency, a new dataset may be created. In this way the price development remains visible. The checked price is displayed in COLLECTION Info and used in invoices.
Production costs
How much was spent on producing the work?
Insurance and appraised values
Insurance value
Insurance value, currency and date.
Insurance
Which company is the object / work insured with?
Appraiser
Who determined the insurance value?
Note
Notes on the insurance.
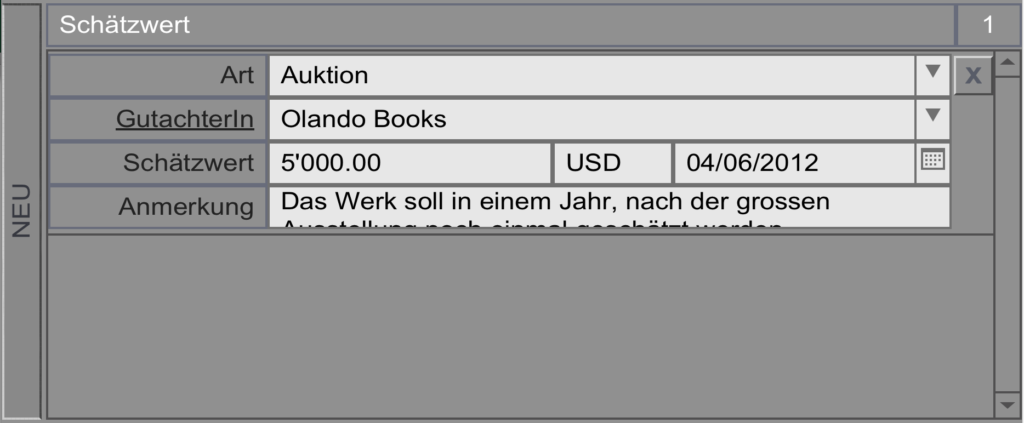
Appraised value
By clicking the NEW button you can record any number of estimates to keep track of the development.
Type
Type of appraised value: e.g. by an auction house, a gallery or by personal assessment.
Appraiser
Who determined the appraised value?
Appraised value
Appraised value, currency and date.
Note
Notes on the appraisal.
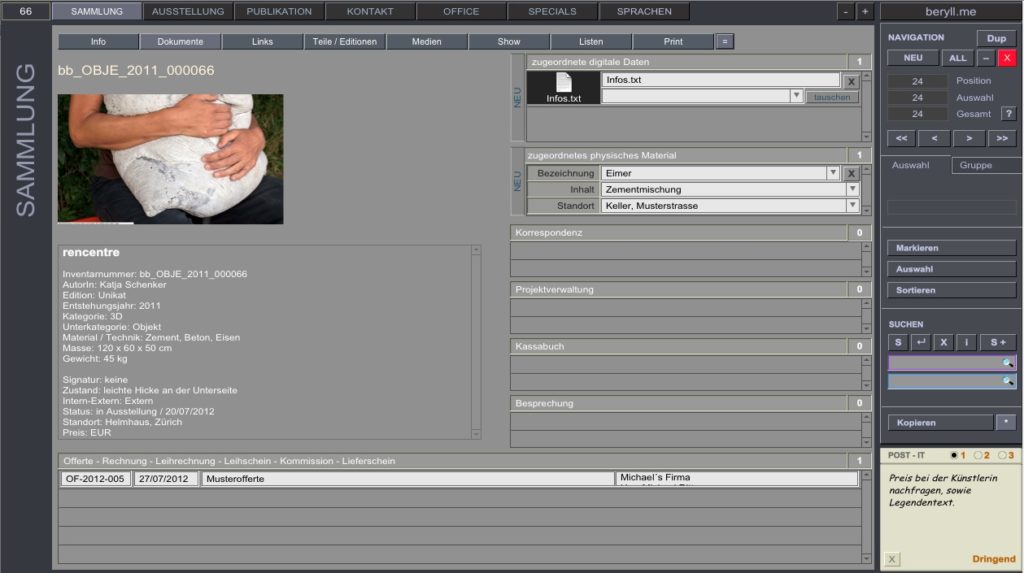
COLLECTION Documents
This section contains links to documents created in the OFFICE module that are connected to the object / work. You can also upload files and list the location of physical material.
Offer, Invoice, Loan invoice etc.
Links to documents created in the OFFICE module that are connected to the object / work. Clicking on the entries takes you to the corresponding dataset.
Digital attachments
Upload digital material and add remarks or descriptions.
Additional physical material
Additional physical material can be listed with content and location.
Correspondence
Links to correspondence created in the OFFICE module that is connected to the object / work. Clicking on the entry takes you to the corresponding dataset.
Project
Links to projects created in the OFFICE module that are connected to the object / work. Clicking on the entry takes you to the corresponding dataset.
Cash book
Links to cash books created in the OFFICE module that are connected to the object / work. Clicking on the entry takes you to the corresponding dataset.
Meeting
Links to meetings created in the OFFICE module that are connected to the object / work. Clicking on the entry takes you to the corresponding dataset.
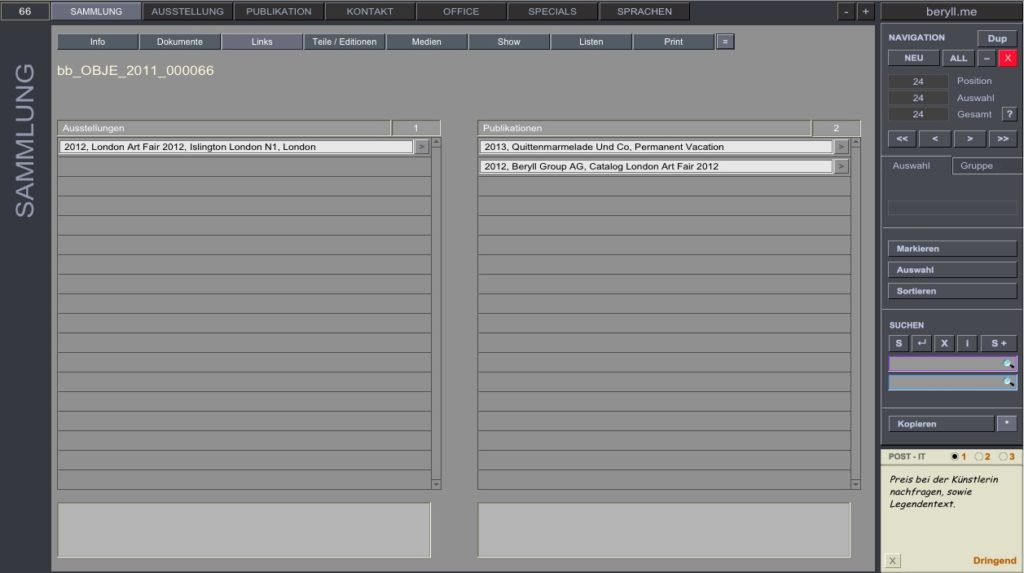
COLLECTION Links
This section contains links to the modules EXHIBITION and PUBLICATION as well as space for related notes.
Exhibitions
Links to exhibitions connected with this object / work. Clicking on the Go to button takes you to the corresponding dataset.
Publications
Links to publications connected with this object / work. Clicking on the Go to button takes you to the corresponding dataset.
COLLECTION Parts / Editions
If you are dealing with a multi-part work or an edition you can create a detailed entry for each part / edition number here.
Type of work part
e.g. work part, work component, fragment, replacement part, remnant from performance, equipment, etc.
no.
Part or edition number. Entries in this field appear in the individual inventory number.
Category
Describe the type of work / art form.
Material / technique
e.g. acrylic on fabric, oil on wood, pencil on paper, mixed media, video colour/sound/stereo, colour proof on aluminium etc.
Weight
The weight of the work part is important for the delivery note and may be entered in kg or lb. beryll automatically converts your entry to the other unit of measurement and displays the result.
Signature
List the exact wording of any signature, e.g. Eva Hesse, New York 1969
Production
By whom and when was the object / work produced?
Note
Space for your notes.
Intern / Extern
Intern / Extern indicates whether a work is located within any of your premises.
Status
e.g. stored, installed, sold, destroyed, not for sale etc.
Location
Where is the medium currently located? e.g studio, storage, gallery
Exact
Exact information on the current location (e.g. a shelf number – R13_C).
Type of packaging
e.g. parchment paper and plastic, bubble plastic and cardboard packaging, portfolio etc.
Involved
List other persons / companies involved.
Price
List the price and currency.
Property of
Enter the name(s) of the work’s owner(s) here.
Dimensions
Click the Dimensions button to enter or change the measurements.
COLLECTION Media
Under Media all external data storage devices may be recorded and assigned a number.
Category
What is the medium classified as? (e.g., master, dub master, archive master, master for DVD or raw material, etc.)
Data medium
Type of data storage device (e.g. CD, DVD-R, Mini-DV, Digital Betacam, Flashcard, DAT, LP, etc.)
File format
Type of file (e.g., aiff, mov, mpeg or Quicktime, medium format, etc.)
Recording
The way in which the medium is recorded or programmed (e.g. 12 minutes 3 seconds with closing credits, looped).
Sound
Type of sound recording (e.g. mono, stereo, no sound)
Media subtitle
Subtitle of medium.
Collaboration
Information entered in Collaboration on the COLLECTION Edit page is pulled up here and may be supplemented or modified for this medium.
Date created
Date the data storage device was created.
Recording techn.
Recording technology used for the medium (e.g. 25 inter-laced or 50 progressive in the case of video, scan 300dpi in the case photography, 4-channel stereo in the case of audio).
Aspect ratio
e.g. 4:3 or 16:9 with video, letterbox etc.
Pixel
Ratio and arrangement of pixels (e.g. 720 x 576 in the case of PAL or 1920 x 1080 for HD, 300dpi or 10 Mio pix in the case of photographs, etc.)
Producer
Who produced the medium?
Note
Note regarding the medium.
Intern / Extern
Intern / Extern indicates whether a work is located within any of your premises.
Exact
Exact status, e.g. at exhibition or donated.
From / to
If the medium has been passed on, as a gift or only temporarily, the name of the person may be recorded here.
Off-site from / until
If the medium is temporarily off-site, the time frame my be recorded here.
Location
Where is the medium currently located? e.g studio, storage, gallery
Exact
Exact information on the current location (e.g. a shelf number – R13_C).
Belongs to part:
If a medium belongs to a particular work part, the work part number may be recorded here.
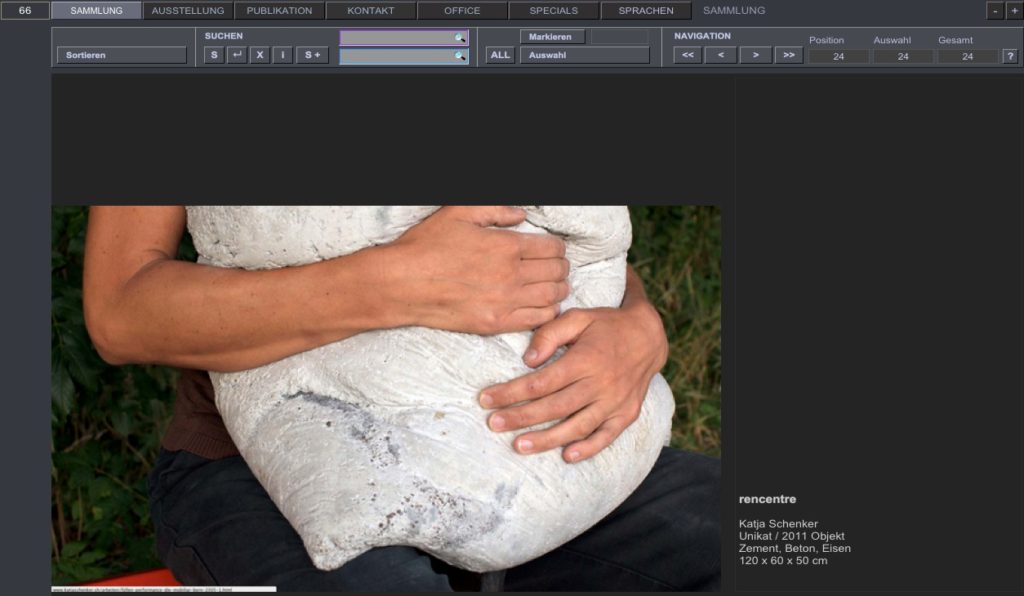
COLLECTION Show
Show allows you to present your collection similar to a catalogue, including the type of information you would use for a publication.
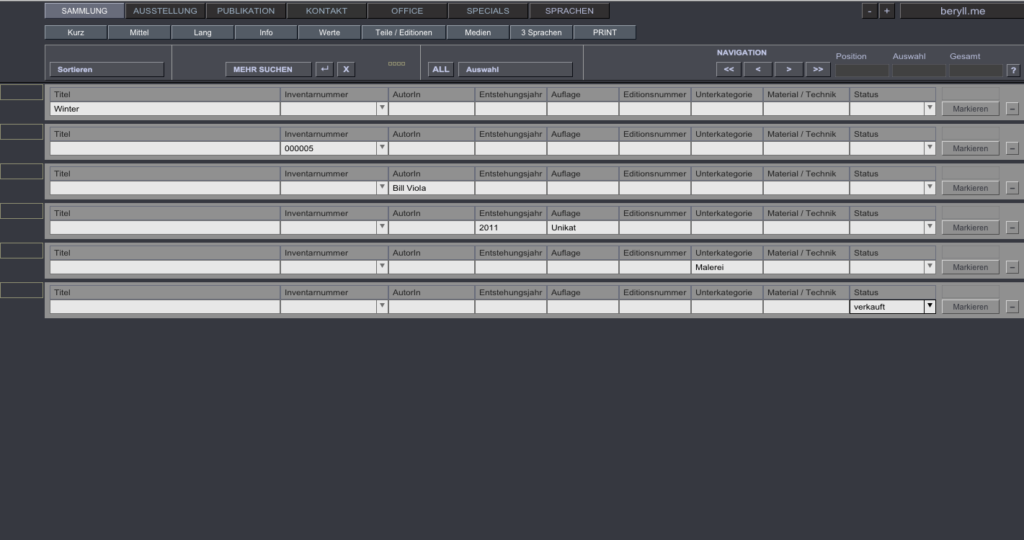
COLLECTION Lists
Every module can be viewed as a list. Lists can be created based on different layouts. You can scroll through the data sets and select them. Data sets may also be sorted according to various criteria and printed.
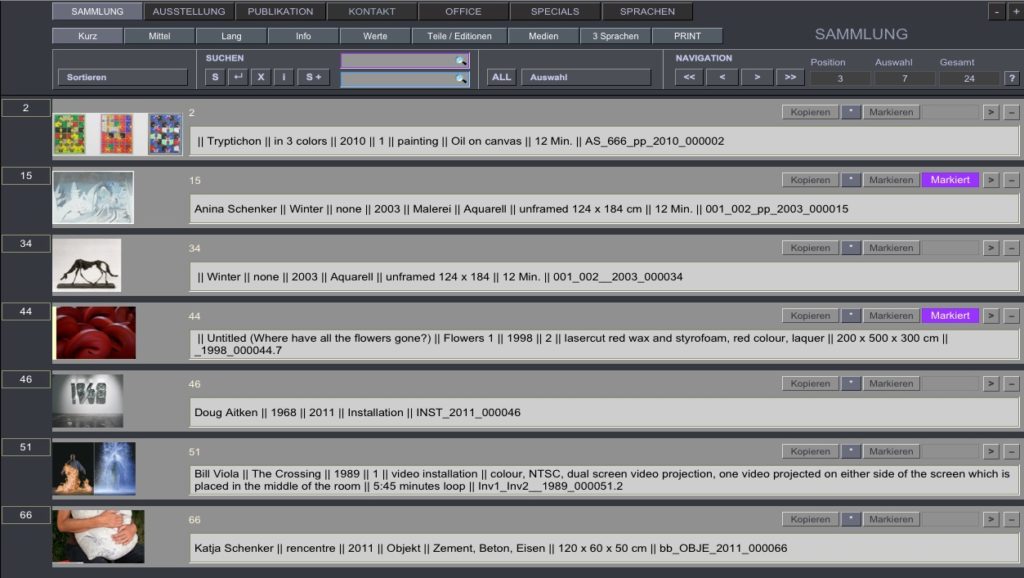
Short
List – short only shows key information. In this layout you cannot edit. You can scroll the datasets and mark or exclude individual records to obtain a selection.
Medium
Slightly less extensive list layout than the long list format.
Long
List – long presents an overview of the module’s most important categories. Data entries can be viewed and edited.
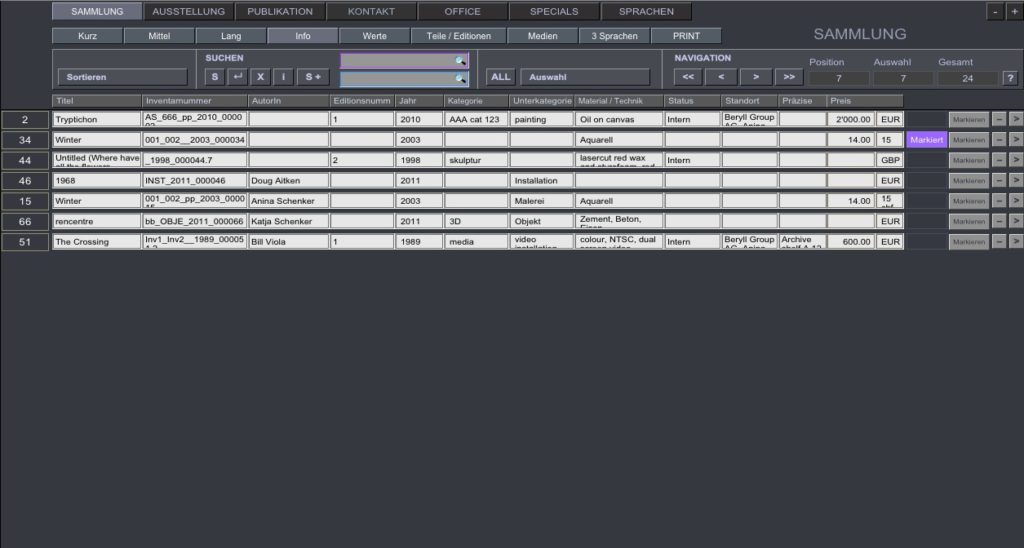
Info
This list can be sorted and edited just like a table. Repetitive editing can quickly be taken care of.
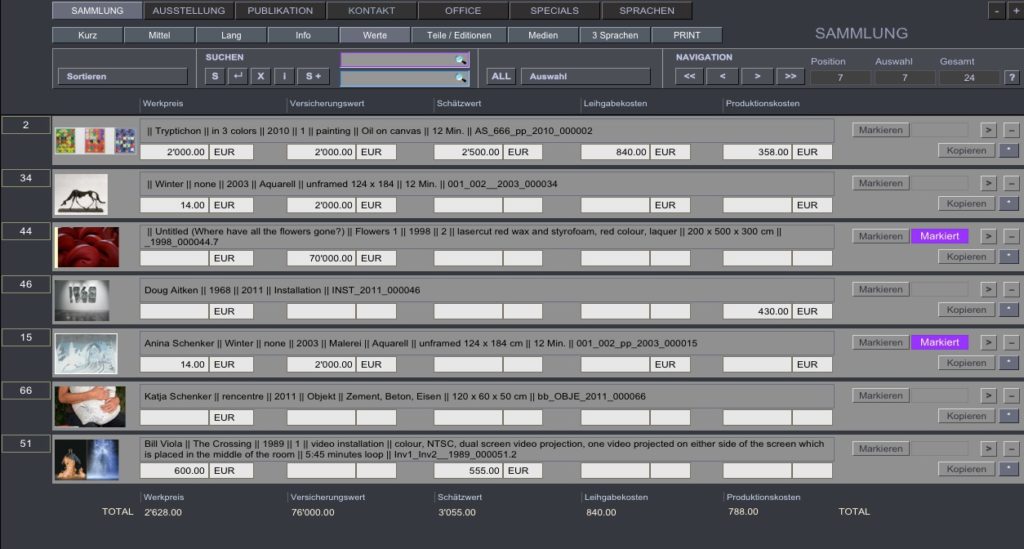
Values
All sales prices, insurance values, appraised values, loan costs and production costs for works are listed and added up here, allowing you to see at one glance, for instance, the combined insurance value of all works in an exhibition.
Parts / Editions
This list displays the individual work parts and editions so that you can edit, mark and print them one by one.
Media
Shows all datasets with allocated media.
3 Languages
beryll.2.5 has the ability to switch between german, english and french during runtime. This changes the field titles, but not the field content. However, the fields title, category, subcategory, material and technique can be completed in all three languages. Thus the content will adapt when you switch from one language to another. The language list lets you edit the entries in all languages at once and is useful for repetitive corrections.
COLLECTION Print
beryll provides various layouts to create documents and labels. These are described in more detail under Print.
EXHIBITION Info / Edit
EXHIBITION Info / Edit comprises the basic data of an exhibition.
Title
Exhibition title
Type
e.g. Art fair, Biennale, Screening etc.
Solo / Group
Is it a solo or group exhibition?
Status
e.g. in process of planning, took place etc.
City / town
Where is the exhibition taking place?
Exhibition venue
Name of the museum, gallery etc.
Curator
Who curated the exhibition?
Exhibition duration
Use the calendars to record the exhibition dates.
Loan period
Use the calendars to record the loan period of the works.
Contact
Who is the primary contact at the institution?
Technical staff
Who is in charge of installing the exhibition?
Agreements
Specify any arrangements made.
Material received
Additional received documents, plans or catalogues.
Participating artists
Which artists are featured in the exhibition?
Note
Notes regarding the exhibition.
Work(s) in this exhibition
Using the Allocate work button lets you select works that have been registered in the COLLECTION module. You can also click the NEW button to create a work entry specifically for this exhibition.
EXHIBITION Work list
Work list shows all works featured in this exhibition. Here you can sort and edit the list as well as print it in various layouts.
EXHIBITION Documents
This section contains links to documents created in the OFFICE module that are connected to the exhibition. You can also upload files and list the location for physical material.
Offer, Invoice, Loan invoice etc.
Links to documents created in the OFFICE module that are connected to the exhibition. Clicking on the entries takes you to the corresponding dataset.
Digital attachments
Upload digital material and add remarks or descriptions.
Additional physical material
Additional physical material can be listed with content and location.
Correspondence
Links to correspondence created in the OFFICE module that is connected to the exhibition. Clicking on the entry takes you to the corresponding dataset.
Project
Links to projects created in the OFFICE module that are connected to the exhibition. Clicking on the entry takes you to the corresponding dataset.
Cash book
Links to cash books created in the OFFICE module that are connected to the exhibition. Clicking on the entry takes you to the corresponding dataset.
Meeting
Links to meetings created in the OFFICE module that are connected to the exhibition. Clicking on the entry takes you to the corresponding dataset.
EXHIBITION Links
This section contains links to the modules COLLECTION and PUBLICATION as well as space for related notes.
Work
Links to works connected with this exhibition. Clicking on the Go to button takes you to the corresponding dataset.
Publications
Links to publications connected with this exhibition. Clicking on the Go to button takes you to the corresponding dataset.
EXHIBITION Show
Show allows you to present your exhibitions similar to a catalogue, including the type of information you would use for a publication.
EXHIBITION Lists
Every module can be viewed as a list. Lists can be created based on different layouts. You can scroll through the data sets and select them. Data sets may also be sorted according to various criteria and printed.
EXHIBITION Print
beryll provides various layouts to create documents and labels. These are described in more detail under Print.
PUBLICATION Info / Edit
PUBLICATION Info / Edit comprises the basic data of an publication.
Title
Title of publication
Shelfmark
Does the book have a shelf mark / inventory number?
Subtitle
Subtitle of the publication
Type
e.g. catalog, monograph, artist’s book, letter, newspaper article or catalog essay etc.
Subject
The subject may be recorded using keywords.
Author
Who wrote the book/article/essay?
Publication
Publication in which the article/essay was published, e.g. journal, catalog, anthology etc.
Publisher
Which is publishing company?
Editor
Who ist the editor?
Graphic design
Who did the graphic design and layout?
Published
Publication date / year
Issue / volume
In which issue/volume has the text been published?
Place of publication
e.g. Zurich, Switzerland
Bibliography
The three bibliography buttons create bibliography entries based on the information entered above.
Publication for exhibitions
Use the Allocate exhibition button to list exhibitions that are connected with this publication.
Works in publication
Use the Allocate work button to select works from the COLLECTION module. The artists are automatically listed in the Participating Artists entry further down.
SBN / ISSN
ISBN or ISSN number
Number of volumes
Number of volumes the publication consists of
Pages
How many pages does the publication have?
Language
Which language is the publication published in?
Edition
Number of copies printed, e.g. 5000
Illustrations
Number and type (color or b/w) of the illustrations included in the publication
Essays / Pages
Page references of the journal article, catalogue essay or pictures of your works. If you as an artist or author only want to make a reference to your contribution/texts or images you can also list the applicable information here.
Participating Artists
Which artists are featured in the publication?
Stock
How many copies of the publication do you still have in stock?
Collation
e.g. 30 x 42 cm, hardcover, softcover etc.
Location
Where are the remaining available copies stored?
Production costs
How much was spent on producing the publication?
Sales price
List the sales price and currency.
URL
In the case of articles published in the internet you may enter the URL here.
Note
Space for further notes.
Text and translation
You may type or copy the text of the publication directly into the field. If you have the text in several languages simply use the NEW button to create new entry fields.
PUBLICATION Documents
This section contains links to documents created in the OFFICE module that are connected to the publication. You can also upload files and list the location of physical material.
Offer, Invoice, Loan invoice etc.
Links to documents created in the OFFICE module that are connected to the publication. Clicking on the entries takes you to the corresponding dataset.
Digital attachments
Upload digital material and add remarks or descriptions.
Additional physical material
Additional physical material can be listed with content and location.
Correspondence
Links to correspondence created in the OFFICE module that is connected to the publication. Clicking on the entry takes you to the corresponding dataset.
Project
Links to projects created in the OFFICE module that are connected to the publication. Clicking on the entry takes you to the corresponding dataset.
Cash book
Links to cash books created in the OFFICE module that are connected to the publication. Clicking on the entry takes you to the corresponding dataset.
Meeting
Links to meetings created in the OFFICE module that are connected to the publication. Clicking on the entry takes you to the corresponding dataset.
PUBLICATION Show
Show allows you to present your publications similar to a catalogue.
PUBLICATION List
Every module can be viewed as a list. Lists can be created based on different layouts. You can scroll through the data sets and select them. Data sets may also be sorted according to various criteria and printed.
PUBLICATION Print
beryll provides various layouts to create documents and labels. These are described in more detail under Print.
CONTACT Info / Edit
The CONTACT module is where you register all persons, companies and institutions that you are dealing with. These entries are then available for use in allocations, correspondence and any other administrative tasks.
Company / Institution
Name of the company or institution.
Department
If it is a large organization you may specify the department here. This entry can also be included in the address.
Google button
Clicking the Google button opens a browser window that performs a web search for the name of the company and/or person.
Salutation
Mr, Ms etc.
Title
Dr., Prof. etc.
Client number
Is there already an existing client number for this person or company?
First name
First name or preferred name of this person
Surname
Family name of this person
You formal / You
How do you address this person?
I
The I button refers to the person or institution that owns the database. Their contact details are saved on the I button and can be used to quickly complete entry fields instead of going through the allocation procedure.
The I button can be assigned temporarily as well, for example when registering large bodies of work by a particular artist. However it is not possible to have more than one I. When a second contact is marked as I, beryll automatically resets the first I mark.
Profession / position
What is the person’s occupation or position within the abovementioned company?
Note
Various notes. These are included everywhere in the CONTACT module where the basic data of this person or company are displayed.
Partner’s name
Press NEW to create a partner entry and tick the “selection” box to include their name in the mailing address. You can create and tick multiple entries.
Contact information
Enter telephone numbers, websites or email addresses here. The first entry field with the drop-down menu serves as a description, e.g. home phone, office number etc. By ticking the selection box you can determine which address to use for mailings.
Stamp area
National, overseas etc.
Language
In which language do you communicate with this person?
Salutation
beryll automatically puts together a form of address which is used in letters. If you prefer a different form simply click on Salutation and type in a dissent address. In this case beryll always uses the dissent address in lieu of the standard greeting.
Address check
Here you see the address as it will appear on labels or other documents.
Address
A person or company can have multiple address entries. The one marked as main entry will be used for printed matter and is displayed in the address check window above.
Type
Business or private? Tick the box if you want to hide the company name
Date
The date automatically shows when an address entry was created.
Street / no
Street and house number
Address suffix
P.O. Box, c/o etc.
Zip code / City
Postal code and town, city
State, Canton
State, Province or Canton
Country
The way the address is put together switches into the customary format depending on which country you enter.
CV
Under CV you can list personal details and enter the CV as a text.
First meeting
When and where did the first meeting take place? You can either use the calendar to enter the date or type directly into the entry field.
Date of birth and City / town
When and where was this person born?
Date of death and City / town
If the person is deceased, list when and where they died.
Nationality
What is this person’s nationality?
Lives in
Where do they live?
Life data
The Life data button uses the personal details to create a one-line summary.
Vita
Here you have space to enter the complete CV or similar texts. You may check which entry should be used when printing. This entry will be used in the print-out of contact data and shown at the top of the list. You may change the selection at any time.
Type
Type of CV: for instance long version, short version. etc.
Language
Language the CV is written in.
Office
This section contains information regarding invoices and bank details.
VAT Number
Value added tax number
Company information for invoice
Additional information regarding the company. These details can be taken from quotes or invoices related to this sender.
Agreements
Specify any arrangements made.
Mentoring
Who is responsible for this person? e.g. a gallery or a specific person, an administration of estate, a scientific institution etc.
Bank account
A person or company can have multiple bank account entries. Tick the entry you wish to use for the invoice.
Bank name
This is the bank where the account is held.
IBAN
Enter the IBAN (International Bank Account Number) number.
Holder
Enter the exact name of the account holder.
PC-account
Account number of the bank’s Swiss postal account.
BLZ
Enter the bank’s routing number or Bankleitzahl (BLZ).
Account No.
This is the account number.
SWIFT
This is the BIC / SWIFT Code.
Fields
Here you can create your own entry fields that, once they have been created, are available for all contact datasets. The first part is for the field label and the second part for the entry. The entry in the second field will be shown everywhere in the CONTACT module where the basic data of this person or company are displayed.
CONTACT Documents
This section contains links to documents created in the OFFICE module that are connected to the contact. You can also upload files and list the location of physical material.
Offer, Invoice, Loan invoice etc.
Links to documents created in the OFFICE module that are connected to the contact. Clicking on the entries takes you to the corresponding dataset.
Digital attachments
Upload digital material and add remarks or descriptions.
Additional physical material
Additional physical material can be listed with content and location.
Project
Links to projects created in the OFFICE module that are connected to the contact. Clicking on the entry takes you to the corresponding dataset.
Meeting
Mailings
Links to meetings created in the OFFICE module that are connected to the contact. Clicking on the entry takes you to the corresponding dataset.
Correspondence
Links to correspondence created in the OFFICE module that is connected to the object / work. Clicking on the entry takes you to the corresponding dataset.
Mailing
This entry lists all serial letters or mails that were sent to the contact.
CONTACT Links
This section contains links to the modules COLLECTION (Work), EXHIBITION and PUBLICATION. The point of reference for links to EXHIBITION and PUBLICATION is the work which is on display in the exhibition or featured in the publication.
CONTACT Acquisition
In the database works that have been allocated to an invoice are considered bought or sold as soon as the invoice has been printed. Information regarding a person’s sales and acquisitions can be viewed here.
CONTACT Show
Show allows you to present your contact datasets similar to a catalogue.
CONTACT Lists
Every module can be viewed as a list. Lists can be created based on different layouts. You can scroll through the data sets, mark and select them. Data sets may also be sorted according to various criteria and printed.
CONTACT Print
beryll provides various layouts to create documents and labels. These are described in more detail under Print.
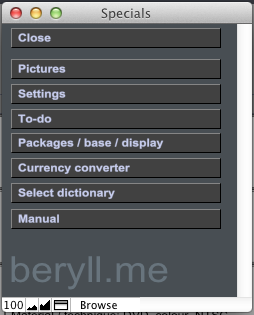
SPECIALS
The Specials section contains less frequently used modules and functions.
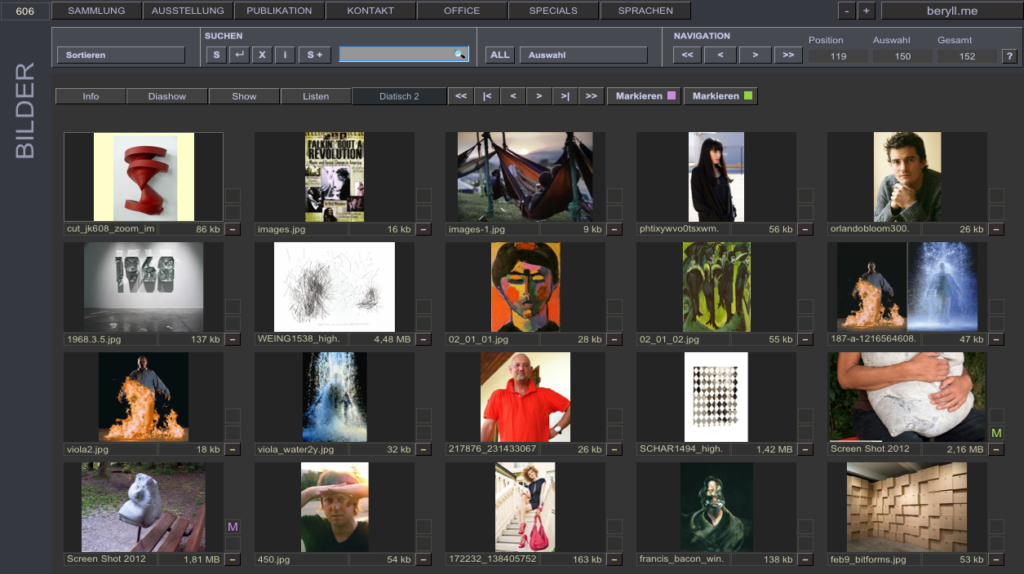
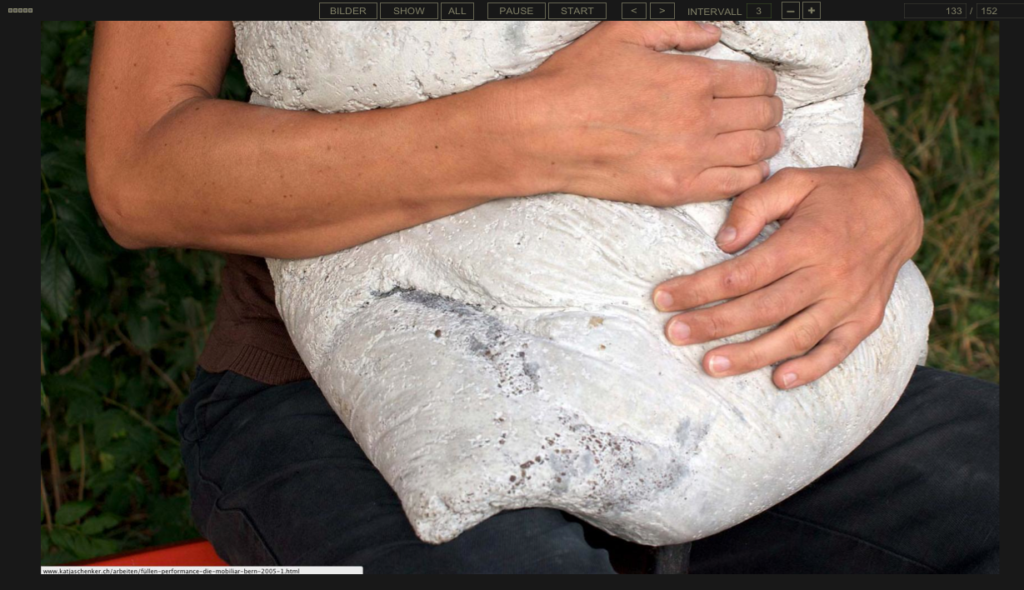
PICTURES
Use the pictures module to centrally manage all your images.
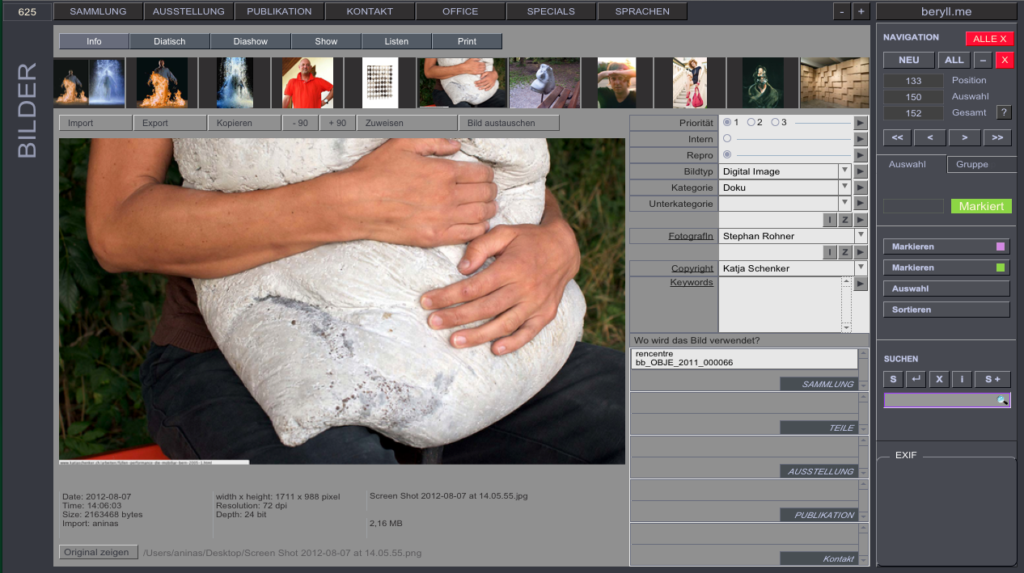
Pictures – Info
Here you can rotate images and add a detailed descriptions. This page also tells you which module and dataset an image is linked to.
Pictures – Slide desk
Your pictures can be viewed on a slide desk. Slide desk 2 comes in a simplified look.
Pictures – Slide show
View your pictures as an automated slide show. You can adjust the interval as you please.
SETTINGS
Here you can adjust the database’s standard settings.
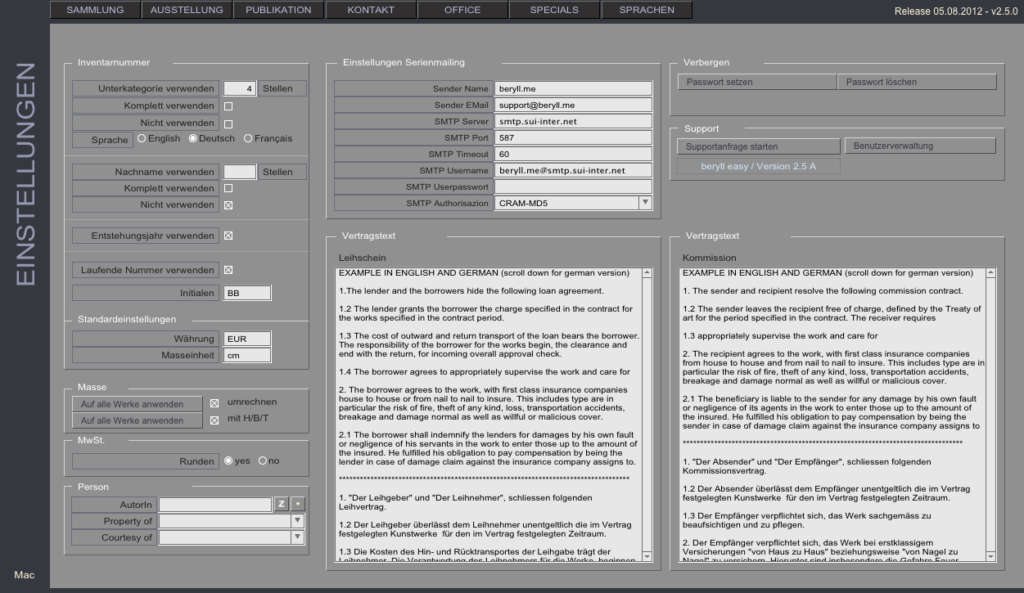
Settings
Adjust the database’s standard settings.
Choose how the inventory number is put together.
Set measurement units and currencies.
You can set an Author, the Courtesy or Property information.
There ready-made samples of terms and conditions documents. Insert your own texts that you want to use for creating contracts.
When creating a new record your preset data will be inserted into the respective fields, but you can still change the entries in the individual record.
If you wish to use the serial mailer, enter your provider data.
Set a password for price display if access to price information is not intended for all users.
BACKUP
Regularly create backup copies of your database!
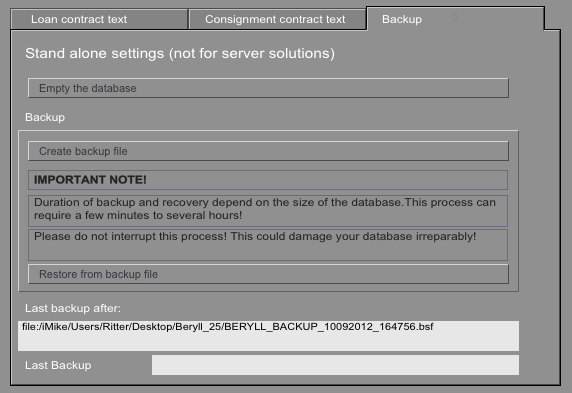
Create backup file
The Settings menu includes a Backup section with the button “Create backup file.”
Clicking this button opens a window where you may enter the location to store the backup copy
BERYLL_BACKUP_(Date and Time).bsf. This allows beryll to automatically retrieve the backup copy when importing.
NEVER rename the file.
As an additional precaution we recommend that you copy this backup file to a DVD or an external hard disk as well.
UPDATE
Keep your database up to date.
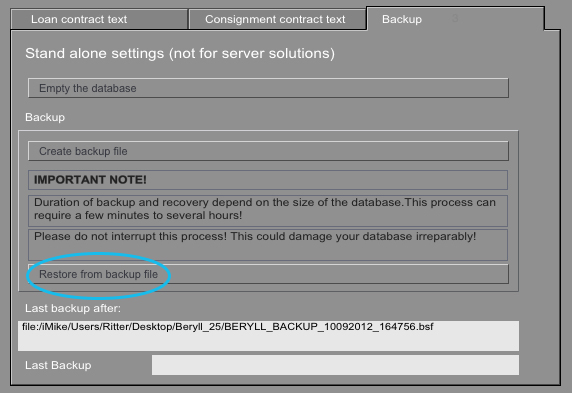
Program updates
 First of all, save a backup copy of your database on your computer.
Go to the program folder and uninstall the beryll program. Then install the new version, which you can download from the beryll website. Open and unlock it.
In the menu, go to SPECIALS -> Settings and choose “Restore from backup file.” Import the most recent backup copy.
This may take a while depending on the amount of data and the size of your database. Do not under any circumstances abort this process. If you do, this may damage your database beyond repair.
TODO
The To-do page helps you to remember tasks that need to be completed and facilitates team communication.
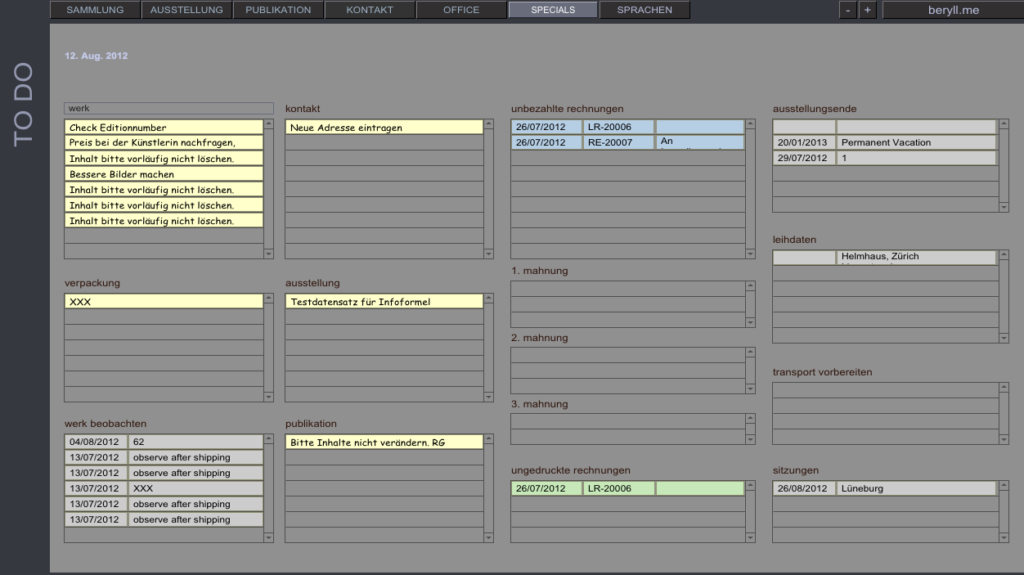
To-do Presets
All post-it notes that have been marked “urgent” are compiled and displayed in one layout. Clicking on an entry takes you to the corresponding dataset so that you can take care of the pending tasks and delete the post-it note.
In the section COLLECTION Detail you can set a date to inspect a work or an object, for example if you need to replace the moth balls of a textile piece. These inspection dates are shown on the to-do list.
This page also lists invoices that have not yet been printed or paid, as well as a record of payment reminders.
Ongoing exhibitions, overdue loan dates, upcoming transports and meetings are all displayed until a date of completion has been set in the corresponding dataset.
PACKAGES / BASE / DISPLAY CABINETS
All kinds of packaging, bases and display cabinets can be registered piece by piece.
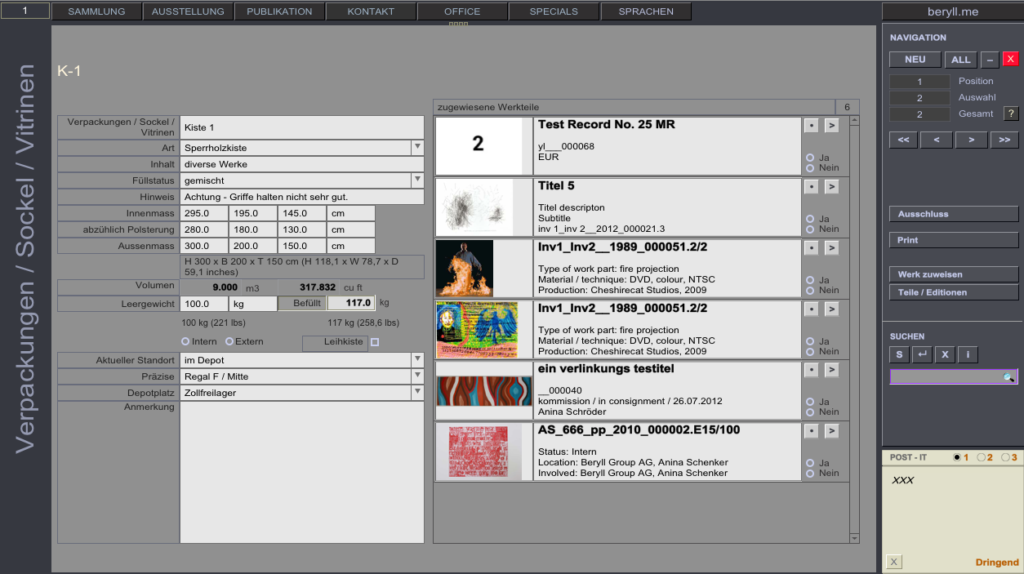
Packaging / Bases / Display cabinets
Keep track of additional material such as packaging, bases, pedestals, display cabinets and other equipment.
Connect the data set with the applicable work, object, part or edition.
CURRENCY CONVERTER
Convert prices quickly and precisely.

Currency converter
The currency converter opens a window in which you can enter the amount and currency you want to convert.
The currency converter will give you the exact exchange rate. Your computer needs to be connected to the internet in order to use this function.
SELECT DICTIONARY
Choose your language in order to use the spell check function. Misspelled words will be underlined in red.
MANUAL
This button opens your browser and connects to the online manual.
SEARCHING THE MANUAL
For quick and conclusive search results please download the beryll online manual as a PDF. Save it to your computer and open it with a separate program such as Preview, PDF-Viewer etc.
PDF “beryll manual”
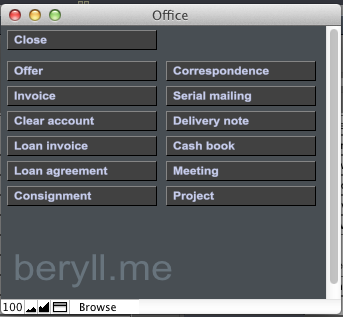
OFFICE
The Office module facilitates diverse workflows.
Create offers, invoices, statements, loan agreements, commission notes, delivery notes etc. and allocate related works, objects, editions and publications directly from the database.
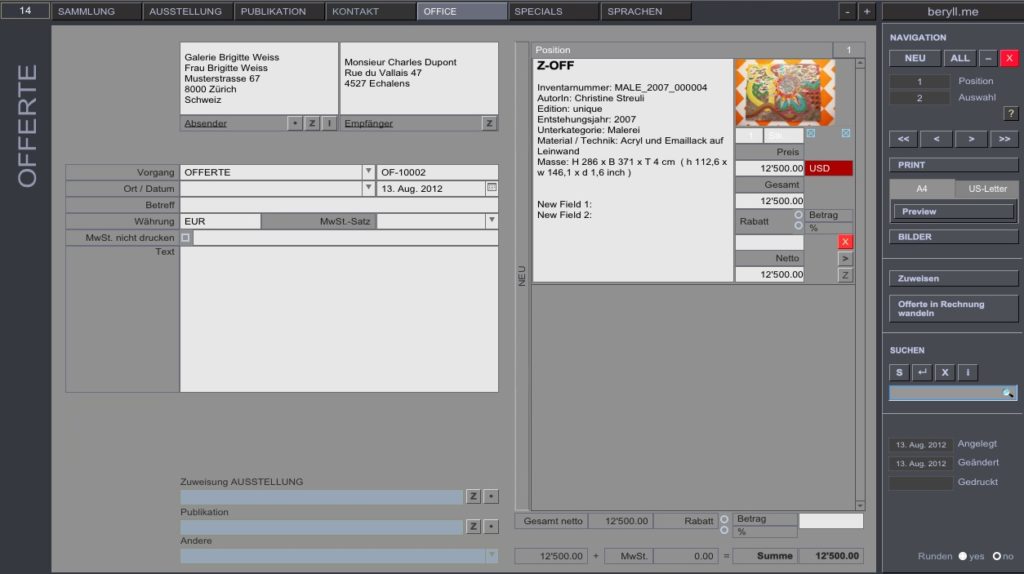
OFFER
This is a step-by-step instruction on how to create an offer. All other Office documents follow the same procedure.
Enter a sender and recipient or allocate these from your contacts by pressing the “Z” button.
Correct the label and abbreviation if necessary and enter the place and date.
Type in a subject. This is a kind of title or header for the document.
Enter the currency in which you want to work and the value added tax percentage.
If you want a different term to be printed instead of the value added tax you can tick the box “Do not print VAT” and type the alternative entry into the field provided.
There is a text box for any personal remarks or additional notes that you want included in the offer.
The light blue fields give you the option to link the document to an exhibition, publication or something else. This shows that they are connected and the Office document will appear in the “Documents” section of the linked record.
On the right hand side you have a portal labelled “Position”. Here you can allocate data from modules by clicking the Allocate button or you can type in data by hand by clicking “NEW” and creating a new, empty data entry field.
Allocate
Works, objects, parts or editions, media, packaging, bases, display cases and publications can be directly linked to the Office section.
In the navigation bar on the right hand side you will find the Allocate button. Clicking this button opens a pop-up window where you can decide what you want to connect to the particular Office document.
Choose your module and another window will open.
Allocate
In this example you choose to allocate a work or an object. Now you can use the grey search field in the top corner and confirm your choice by clicking the Allocate button next to the image.
Continue to allocate further works or close the window. Your work or works are now linked to the document.
This is a list of the various layouts that appear in different modules.
Info
Collection / Exhibition / Publication / Contact
In the main modules all entries are compiled on the Info page, the starting page of each module. Pressing the “=” button shows or hides the field titles.
Edit
Collection / Exhibition / Publication / Contact
Press “Edit” to switch into edit mode and change the record.
Documents
Collection / Exhibition / Publication / Contact
You can import attachments (digital files z.B. .doc, .idd, .pdf etc) for each record.
Addtional physical material (e.g. spare parts) can be listed with a location reference.
This page also contains links to documents created in the OFFICE module that are connected to the record in question. Clicking on the entries takes you to the corresponding dataset.
Links
Collection / Exhibition / Publication / Contact
This section contains links between the modules. In this example a collection record shows links to all exhibitions in which the artwork or object was shown and all publications that mention the work or object.
Show
Collection / Exhibition / Publication / Contact
Show displays content similar to a catalogue and invites the viewer to browse the datasets.
List – Long
Collection / Exhibition / Publication / Contact / Pictures / Parts and Editions / Media
Data entries can be viewed and edited in lists. List – long presents an overview of the module’s most important categories.
List – Medium
Collection / Contact
Slightly less extensive list layout.
List – Short
Collection / Exhibition / Publication / Contact / Pictures
List – short only shows key information. In this layout you cannot edit. You can scroll the datasets and mark or exclude individual records to obtain a selection.
List – Info
Collection / Exhibition / Publication / Contact
This list can be sorted and edited just like a table. Repetitive editing can quickly be taken care of.
List – Values
Collection
The value list tallies work or object prices, insurance values, the current appraised value, as well as the sum of the loaned works or production costs.
List 3 Languages
Collection
beryll.2.5 has the ability to switch between german, english and french during runtime. This changes the field titles, but not the field content. However, in the fields title, category, subcategory, material and technique can be completed in all three languages. Thus the content will adapt when you switch from one language to another. The language list lets you edit the entries in all languages at once and is useful for repetitive corrections.
Search +
Collection
Search + offers you the possibility of an and/or search.
An example: in the first line, enter “2010” under Year created and click on FIND MORE. In the second line, enter “sold” under Status and press Enter to perform the search. The search result will include all works or objects that have 2010 as Year created OR have been sold.
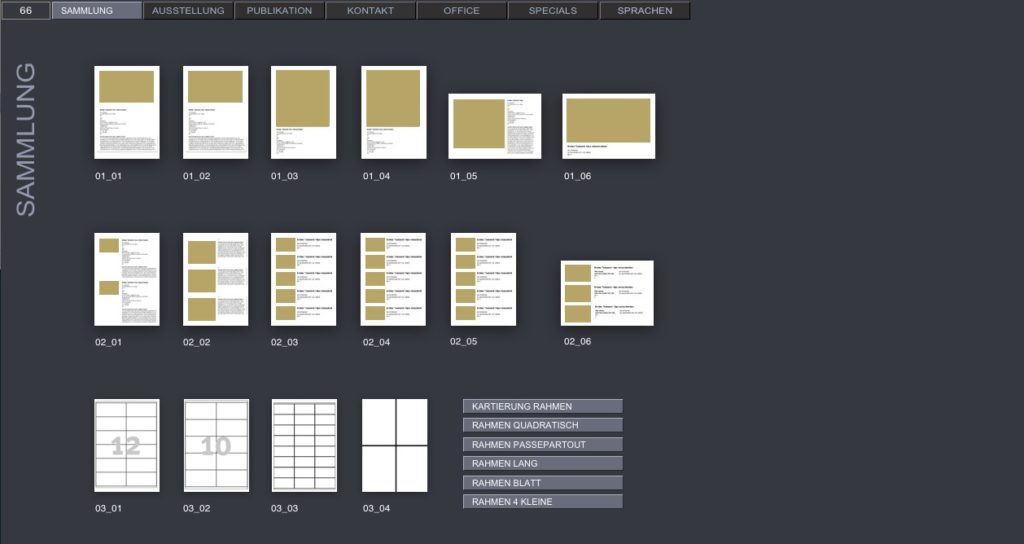
Print
Pressing the Print button in the main modules will take you to a page that offers various print layouts. Select the desired layout by clicking on the icon.
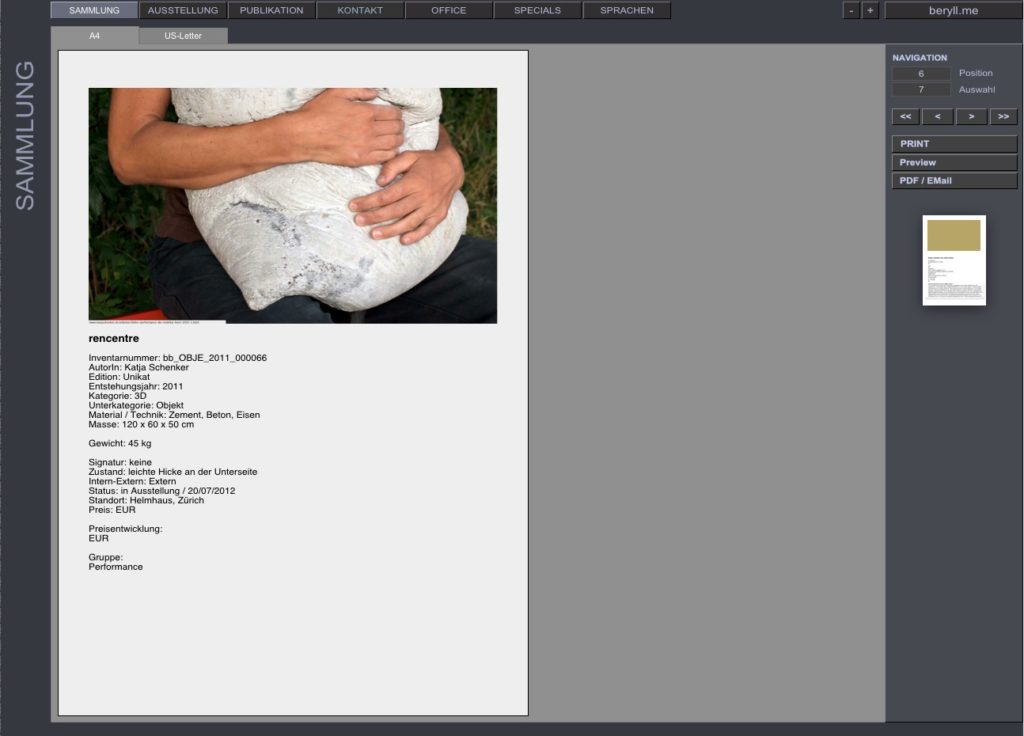
Print – edit
A pop-up window will ask you if you wish to print the current record (where you pressed the Print button) or all records in your selection. Then a window displays your chosen layout and you can edit the text before printing.
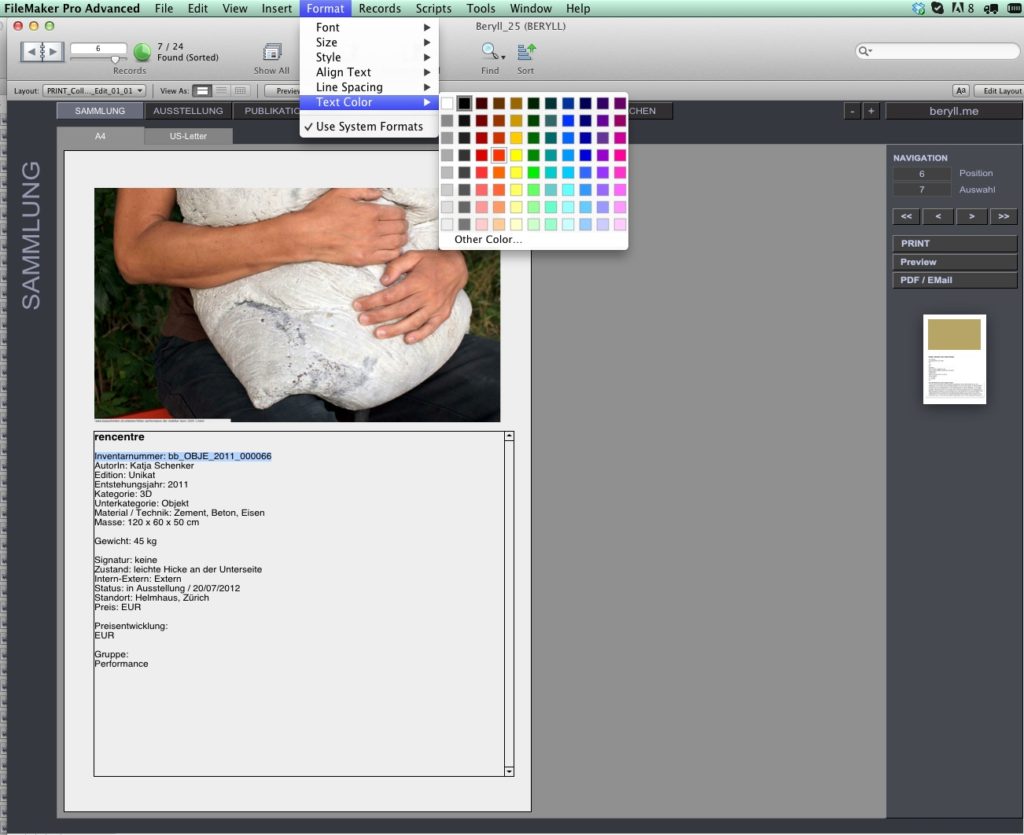
Print formats
Go to Format in the main menu bar to change the font, style or colour of your text. These changes only apply to the current print-out and will not be saved. You can therefore safely delete text without this affecting the information in the database.
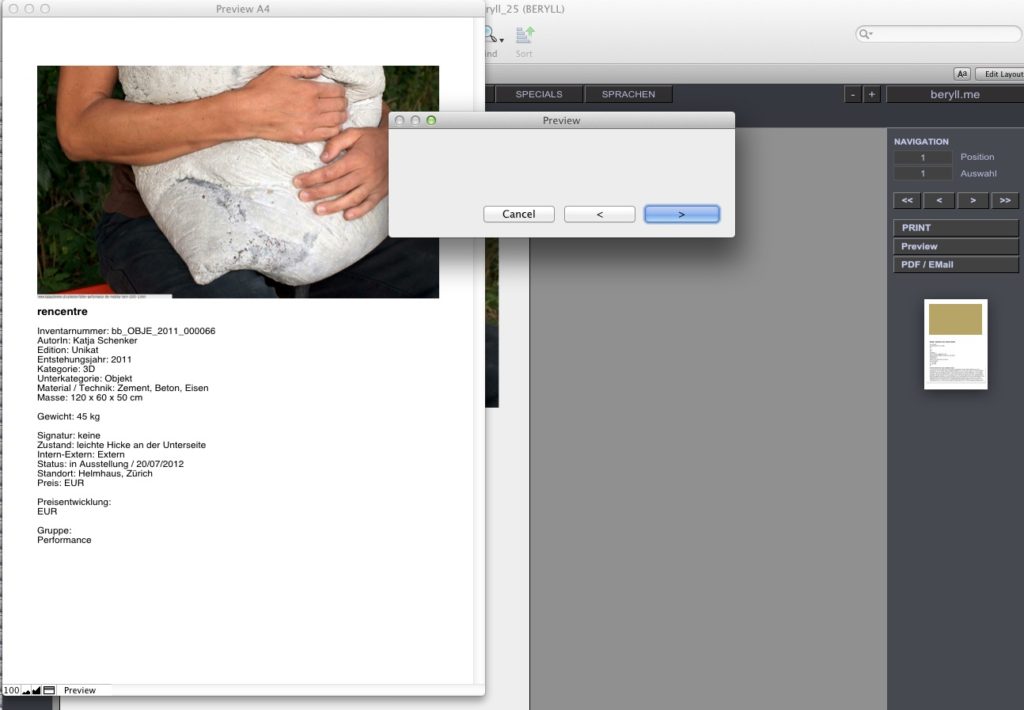
Preview
The Preview function lets you leaf through every page, also in multi-page print-outs, to check and correct line breaks and other formatting before printing your documents.
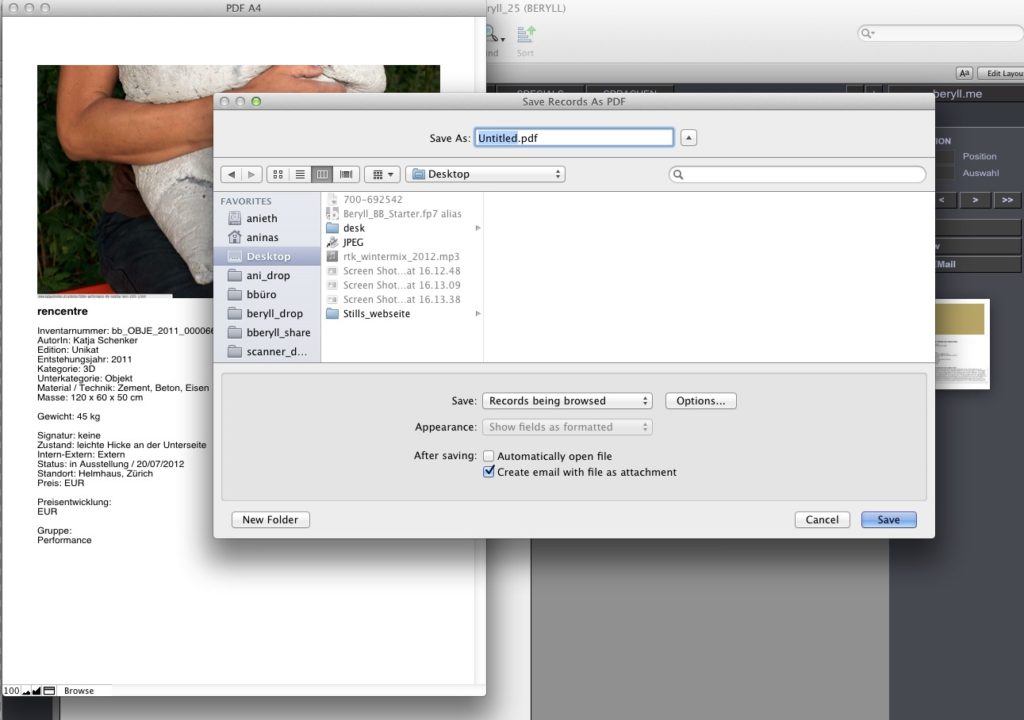
PDF / Email
This function saves a PDF file in the location of your choice. You can change the filename before exporting it, decide to open it at once, or automatically attach it to an email.
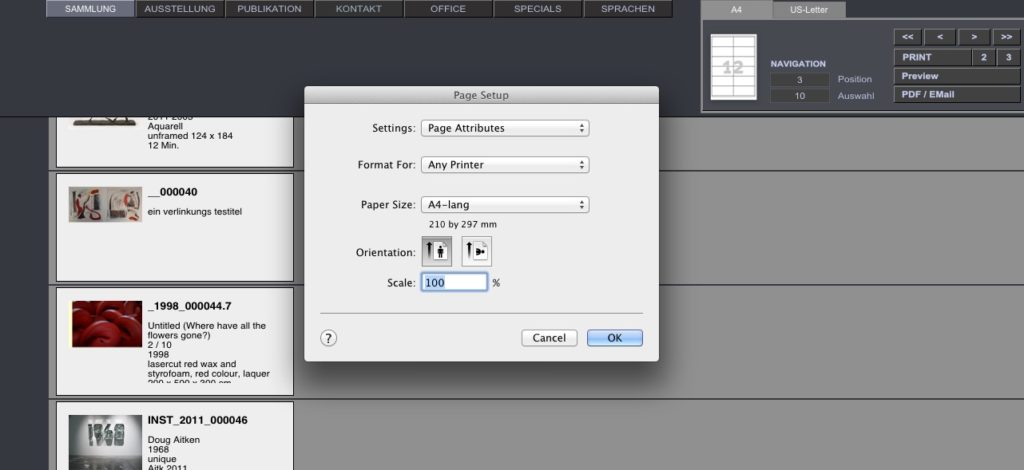
Print – Page setup
With some layouts you will be asked set paper size and orientation. If the pre-defined format should cause problems with your printer you can change your print settings here.
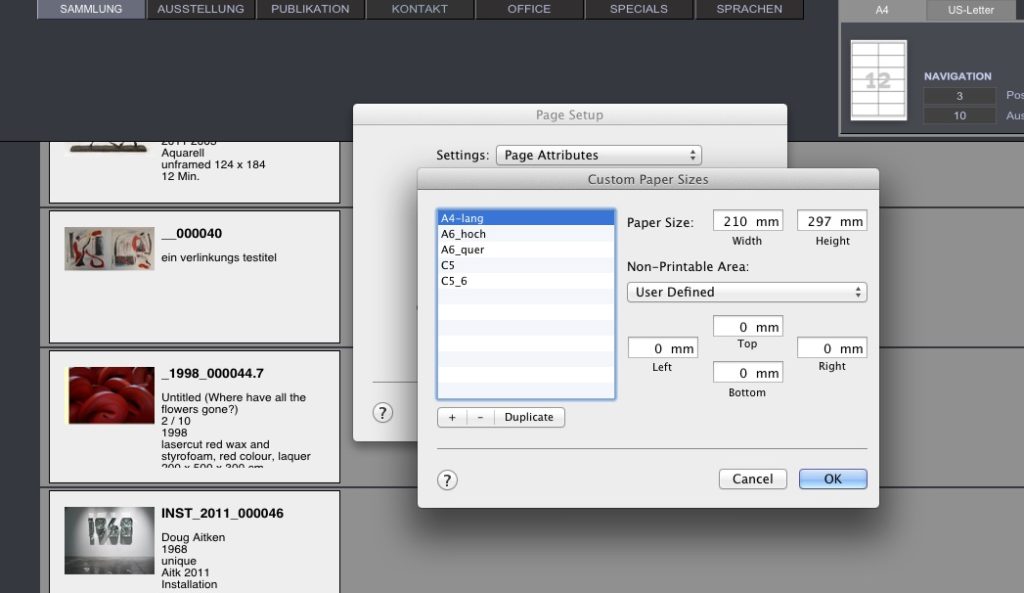
Print – Page setup
Printing labels in particular requires the printer’s paper format setting to be set to maximum. For an A4 page this is 29.7 x 21 cm without margins, otherwise you will not get all the labels. Go to Page Setup and select “Custom Paper Sizes” to delete all the margins in the page preset.

Print
Normally, however, your standard print dialog box will appear where you can set the number of pages etc.